Listener configuration in HAProxy under pfSense 2.1.5.
In the previous article, we introduced HAProxy as a load balancing solution for TCP and HTTP-based applications. In this article, we will continue our look at HAProxy configuration.
The next setting in the “Settings” tab is “Global Advanced pass thru“, which is for text that you would like to pass through to the global settings area. The next section is “Configuration synchronization“. The first check box allows you to synchronize the HAProxy configuration to back up CARP members via XML-RPC, a remote procedure call which uses XML to encode its calls and uses HTTP as a transport mechanism. The next two fields are for the username and password that will be used during configuration synchronization. The username is general “admin” or an admin-level privileged account on the target system, and the password is generally the remote web configurator password. The next three fields are for sync hosts 1, 2, and 3. HAProxy will synchronize settings to the host’s IP address, if it is specified here. Finally, there are two buttons at the bottom. “Save” will just save the configuration, whereas “Save and Check Config” will parse the automatically generated config file and check for errors.
HAProxy: Configuring Listener Settings
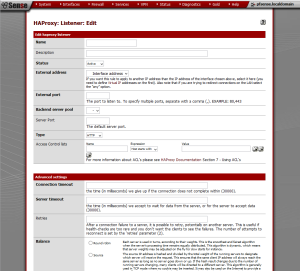
The next tab is “Listener“. By pressing the “plus” button on the right side, you can specify a server to which HAProxy will listen. “Name” is the IP address of the interface to listen to. You can also specify an option “Description“. “Status” indicates whether the server pool is active or disabled. In the next field, “External address“, if you want the rule to apply to an IP address other than the IP address of the interface chosen here, you can select it here. You need to define virtual IP addresses for it first. If you are trying to redirect connections on the LAN, select the “any” option. You can also specify the port to listen to at “External port“, a backend server pool, the default server port, and the protocol at “Type” (HTTP, HTTPS, TCP, or a check for health). You can specifyy an ACL at “Access Control lists“.
Under “Advanced settings“, you can specify several other paramters. “Connection timout” allows you to specify the amount of time in milliseconds HAProxy will wait for a connection to complete, while “Server timeout” indicates the amount of time to wait for data from the server. “Retries” indicates the number of retry attempts. “Balance” indicates what method is used to load balance. If “Round robin” is selected, each server is used in turns, according to their weights. The algorithm is dynamic, which means that server weights may be adjusted on the fly for slow starts. If “Source” is selected, the source IP address will be hashed and divided by the total weight of the running servers to designate which server will receive the request. As a result, the same client IP address will always reach the same server as long as no server goes up or down. If the hash result changes due to the number of running servers changing, many clients will be directed to a different server.
In the next article, we we conclude our look at HAProxy configuration.
External Links:
The post HAProxy Load Balancing: Part Two appeared first on pfSense Setup HQ.